ShowSmartly Support Center
Everything you need to set up automated, NAR-compliant showing responses. Written for real estate agents—no technical experience required.
Getting Started
ShowSmartly automatically responds to showing request emails on your behalf with NAR-compliant messages that include buyer agent commission information. Here's what you need to know to get started.
What ShowSmartly Does
- ✓Monitors your inbox for showing request emails
- ✓Sends professional, NAR-compliant responses automatically
- ✓Includes buyer agent commission details in every response
- ✓Saves you hours of repetitive email work
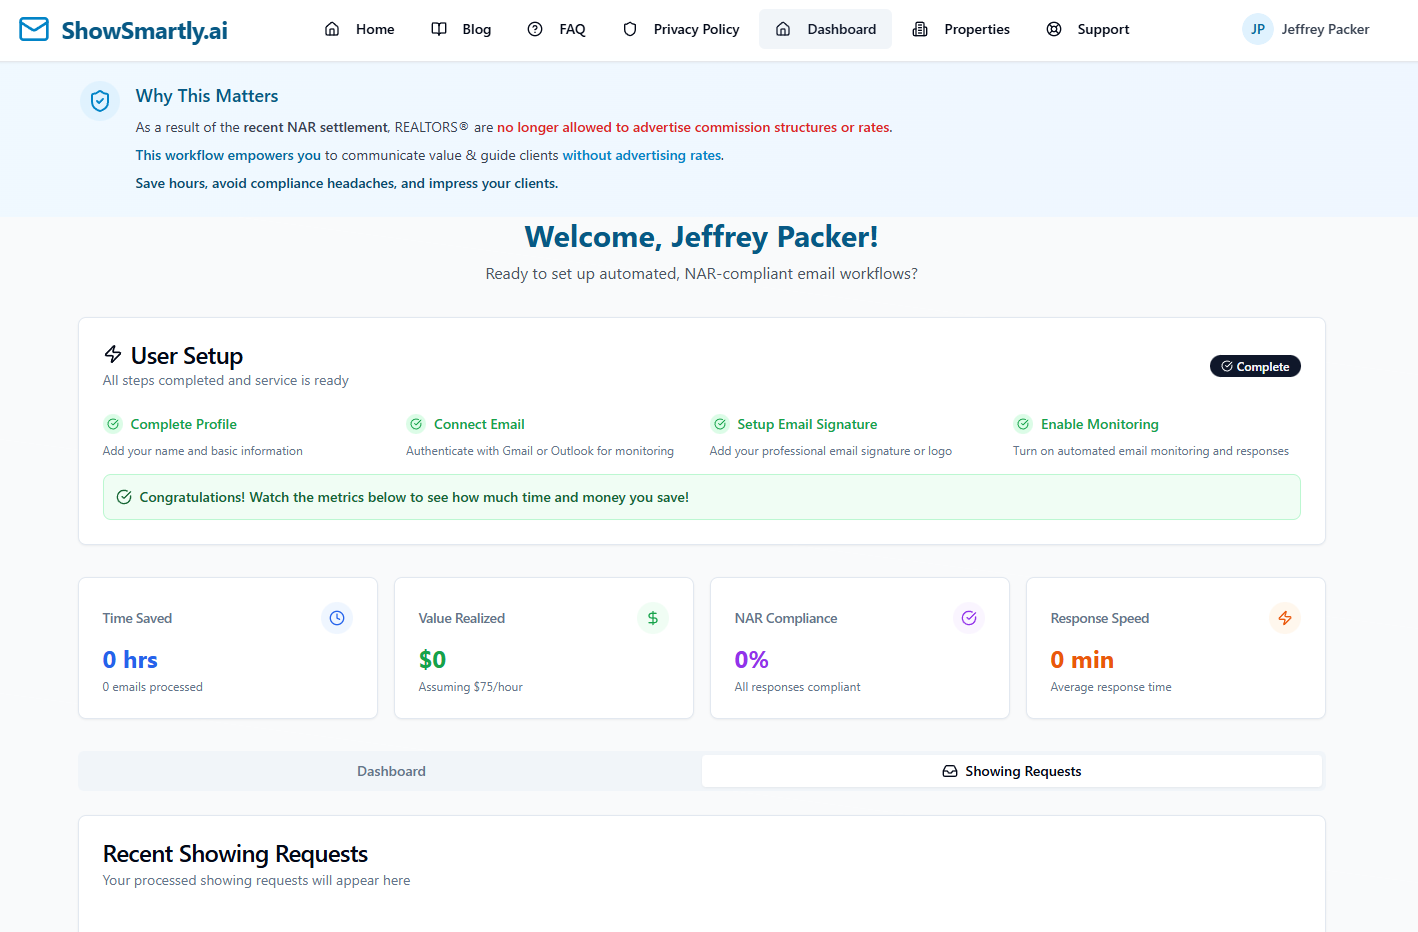
Understanding FUB Mode vs Manual Mode
Mode is Automatic
You don't need to manually select a mode. ShowSmartly automatically detects which mode to use based on whether you've connected your Follow Up Boss account. Add your FUB API key in Settings and you're in FUB Mode. No API key? You're in Manual Mode.
ShowSmartly offers two ways to manage your properties and commission information:
Follow Up Boss Mode
Activated automatically when you add your FUB API key in Settings.
- ✓ Properties sync automatically from FUB
- ✓ Commission pulled from your FUB deals
- ✓ Less manual data entry
- ✓ Stays in sync with your CRM
Manual Mode
Default mode if no FUB API key is configured.
- ✓ No Follow Up Boss account needed
- ✓ Full control over property details
- ✓ Works with any CRM or workflow
- ✓ Simple and straightforward
Follow Up Boss User?
If you use Follow Up Boss, we recommend connecting it. Your properties and commission data sync automatically. Jump to the Follow Up Boss Integration section to get started.
Connecting Your Email
ShowSmartly needs access to your email account to monitor for showing requests and send responses on your behalf. We support Gmail and Outlook/Microsoft 365.
Two-Step Process
Signing up creates your ShowSmartly account, but you'll need to connect your email separately to enable automated responses. After signing up, go to your Profile to connect your Gmail or Outlook account.
Step 1: Create Your Account
- 1
Go to ShowSmartly Login Page
Navigate to showsmartly.ai and click "Sign In" or "Get Started". - 2
Sign in with Google or Microsoft
Choose your preferred sign-in method. This creates your ShowSmartly account. - 3
Account Created
You'll be logged in, but your email is not yet connected for monitoring. You'll see "Email Not Connected" in your Profile.
Step 2: Connect Your Email
- 1
Go to Your Profile
Click on your name/avatar in the top right corner and select "Profile" from the dropdown menu. - 2
Click "Connect Email"
In the Email Connection Status section, click the "Connect Gmail" or "Connect Outlook" button. - 3
Authorize Email Access
Grant ShowSmartly permission to read and send emails on your behalf. This is required for automated responses. - 4
Confirmation
Once connected, you'll see a green "Connected" badge in your Email Connection Status. ShowSmartly can now monitor for showing requests.
Why Two Steps?
We separate account creation from email connection for security. This ensures you explicitly authorize email access and understand that ShowSmartly will monitor your inbox for showing requests.
Keep Your Connection Active
Follow Up Boss Integration
Connect ShowSmartly to your Follow Up Boss account to automatically sync your listings and commission information.
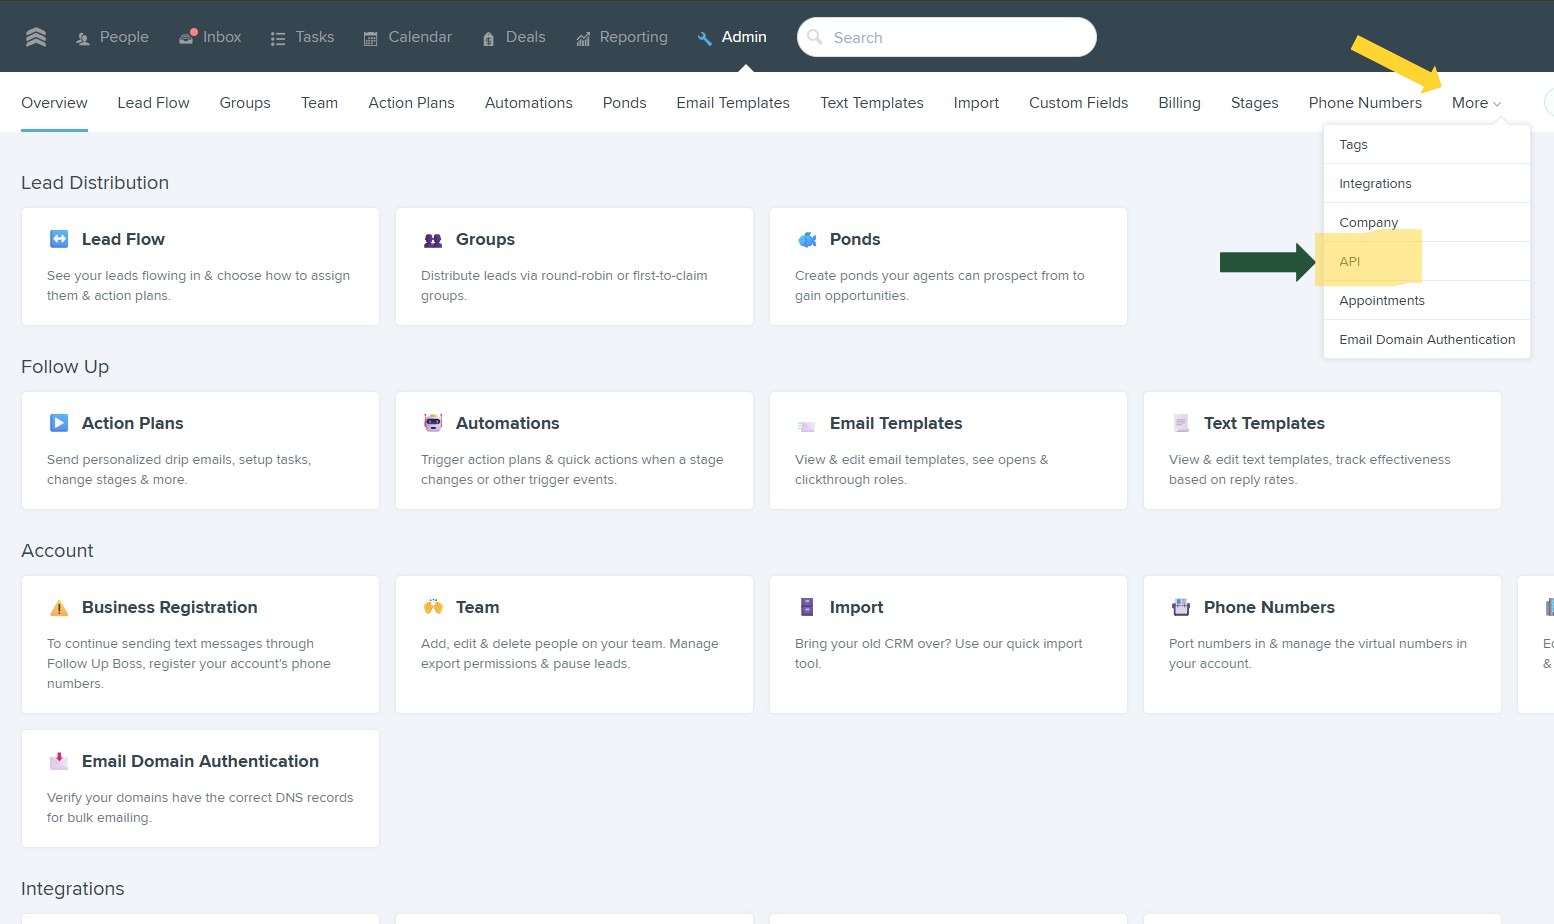
Getting Your FUB API Key
You need an API key from Follow Up Boss to connect. If you don't have one yet, here's how to create or find it:
- 1
Log in to Follow Up Boss
Go to app.followupboss.com and sign in to your account. - 2
Go to Admin Settings
Click on your name or profile in the top right, then select "Admin" from the dropdown menu. - 3
Navigate to API
In the left sidebar, find and click API. This is where your API keys are managed. - 4
Copy Your API Key
You'll see your API key (it starts withfka_). Click the copy button or select and copy the entire key. If you don't have an API key yet, click "Create API Key" to generate one.
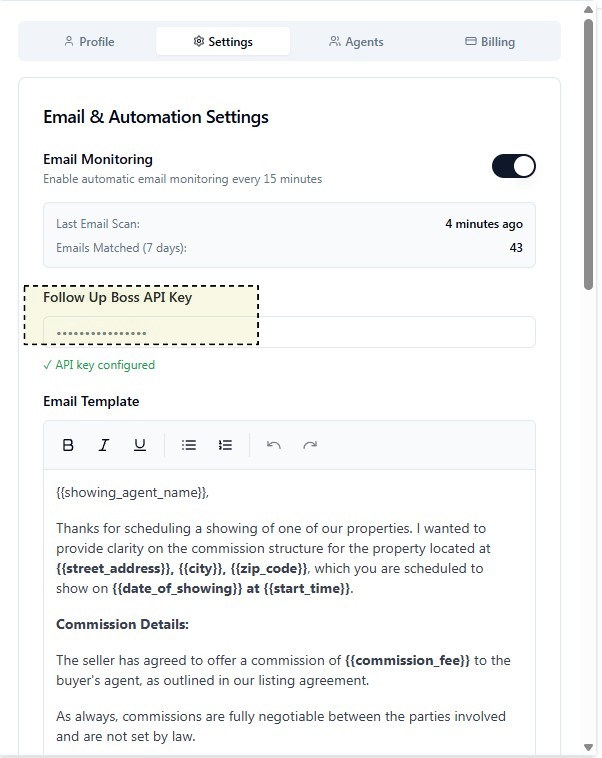
Adding Your API Key to ShowSmartly
- 1
Open Your Account Menu
Click on your profile/avatar in the top right corner of ShowSmartly. - 2
Go to the Settings Tab
In the dropdown, click the "Settings" tab. - 3
Paste Your API Key
Find the "Follow Up Boss API Key" field and paste your key. Click "Save Settings". - 4
You're Connected!
ShowSmartly will now automatically sync properties and commission data from your FUB deals.
How Commission Works with FUB
When a showing request comes in, ShowSmartly looks up the property address in your synced FUB deals to find the buyer agent commission. Properties are synced automatically—you don't need to do anything manually.
What Happens When a Property Can't Be Matched?
If ShowSmartly can't find a matching FUB deal for a showing request address, here's what happens:
- The showing request is flagged as "No Match Found" in your dashboard
- ShowSmartly will NOT send an automatic reply
- ShowSmartly sends you an email explaining that no matching deal was found
- The email includes a link to your ShowSmartly Properties page
- Click the link, find the property, and manually link it to your FUB deal
- Once linked, future showings for that property will match automatically
Tip: To avoid manual linking, ensure your FUB deal names include the full street address and ZIP code.
Setting Up Custom Fields in FUB
For ShowSmartly to automatically retrieve commission from your FUB deals, you need to set up one required field in Follow Up Boss:
Required FUB Setup
For automatic commission lookup to work, you need:
- Buyer's Agent Commission — A custom field you create on your deals
How ShowSmartly Matches Your FUB Deals to Showings
ShowSmartly looks at the deal name in FUB to find the right listing for each showing. Here's how the matching works:
✓ Best Practice: Full Address + ZIP
For the most reliable matching, include the full street address and ZIP code in your FUB deal name:
37252 Jefferson Avenue, Harrison Township, MI 48045When both street and ZIP are present, ShowSmartly can match with high confidence.
✓ Also Works: Unique Street Address
If you can't include the ZIP, ShowSmartly can still match in many cases. If there's only one deal whose name contains the street address, it will be matched automatically:
37252 JeffersonThis works as long as you don't have another "37252 Jefferson..." deal in your account.
⚠ Multiple Similar Deals = No Guess
If there are multiple deals with similar addresses (e.g., "37252 Jefferson Ave" and "37252 Jefferson Ct"), ShowSmartly won't guess—it will treat it as "no match" and ask you for the commission manually.
Example: Street-Only Matching
Here's a real example of the unique street-only fallback:
- Showing request: "37252 Jefferson Avenue, Harrison Township, MI 48045"
- FUB deal name: "37252 Jefferson"
- Result: ✅ Matched automatically (no other "37252 Jefferson" deals exist)
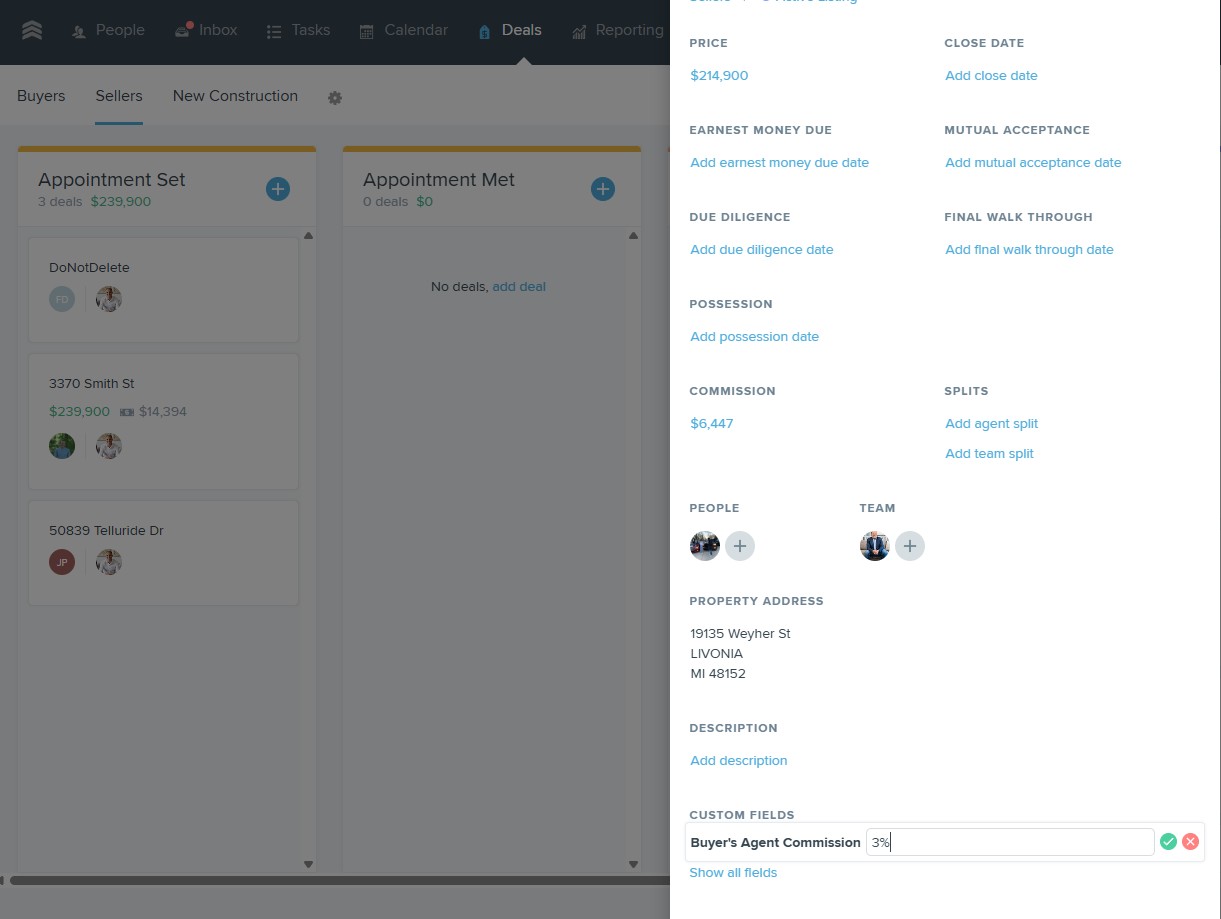
Step 1: Create the Commission Custom Field
You need to create a custom field on your FUB deals to store the buyer's agent commission. ShowSmartly looks for a field with this exact name:
Buyer's Agent CommissionThis field name must match exactly (case-insensitive). Set values like "3%", "2.5%", or "$5,000".
- 1
Go to FUB Admin Settings
In Follow Up Boss, go to Admin → Custom Fields. - 2
Navigate to Deals Custom Fields
Look for the Deals section (not Contacts). Click to manage Deal custom fields. - 3
Add New Custom Field
Click "Add Field" or "Create Custom Field" button. - 4
Name the Field Exactly
EnterBuyer's Agent Commissionas the field name. Choose "Text" or "Short Text" as the field type. - 5
Save the Field
Click Save. The field is now available on all your deals.
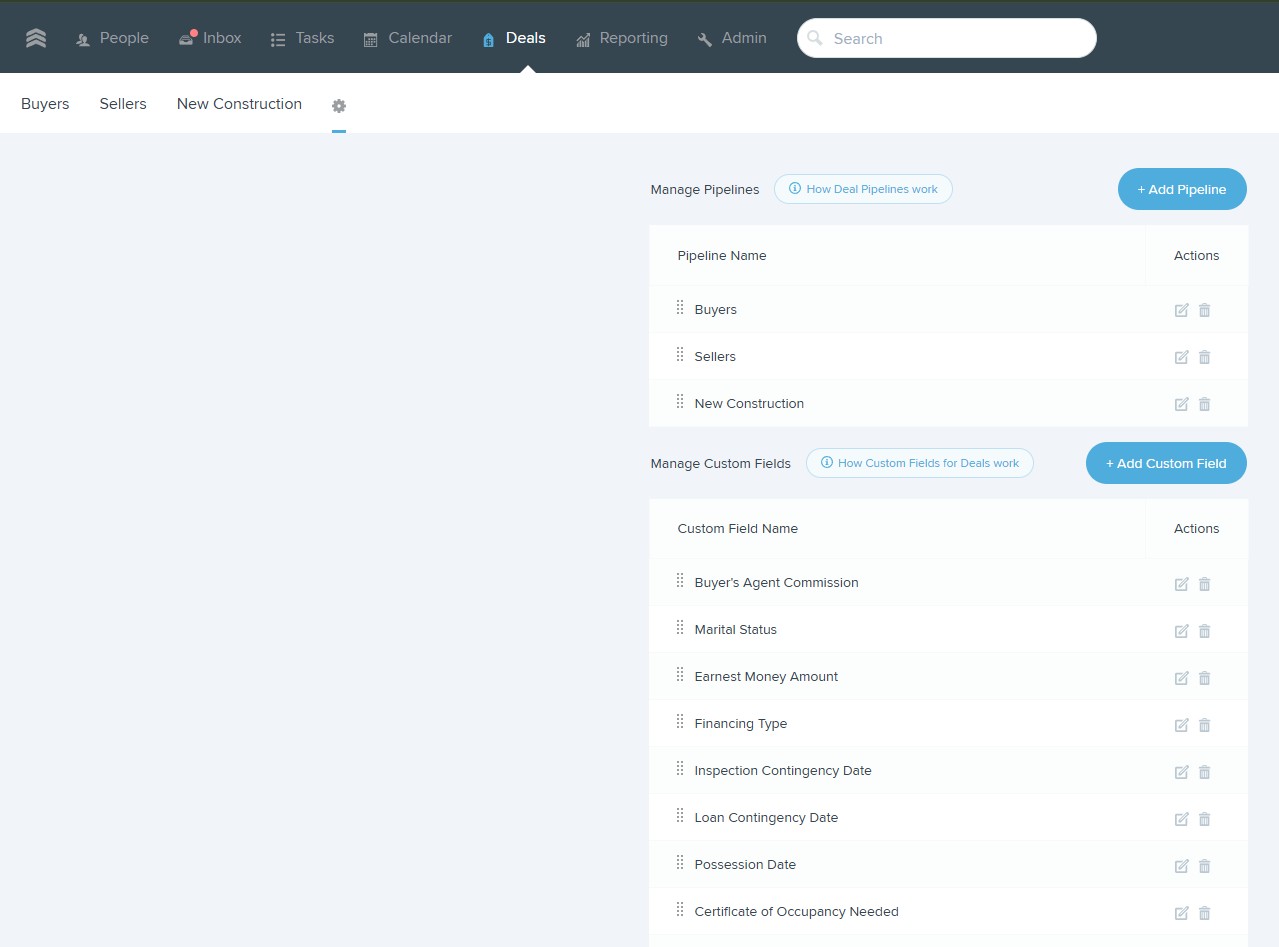
Step 2: Add Commission to Your Deals
Once the custom field exists, you need to populate it on each deal:
- 1
Open a Deal
Go to any deal in Follow Up Boss. - 2
Find the Commission Field
Scroll to find your new "Buyer's Agent Commission" custom field. - 3
Enter the Commission
Enter the commission as a percentage (e.g.,3%) or flat amount (e.g.,$5,000). - 4
Save the Deal
Save your changes. ShowSmartly will now automatically find this commission.
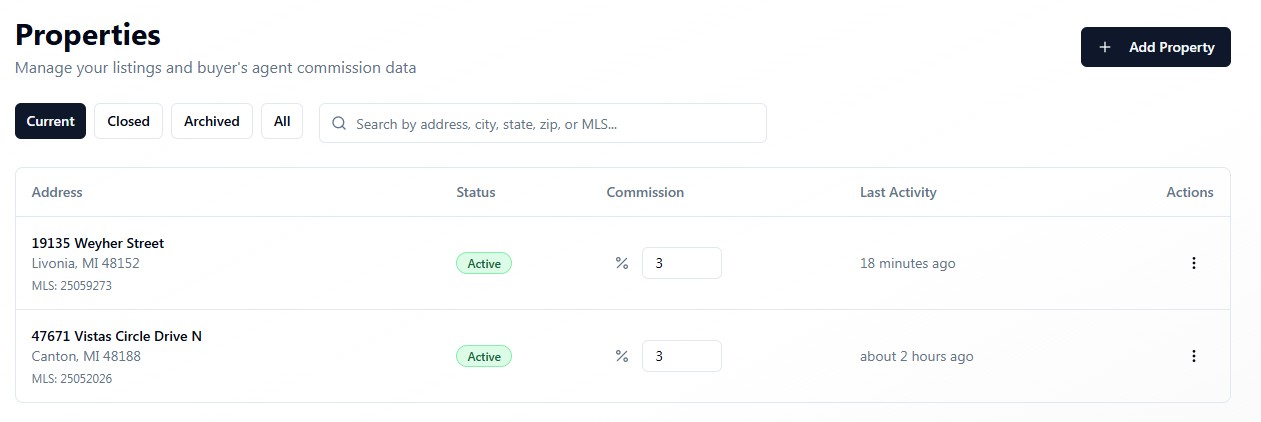
Viewing Commission in ShowSmartly
Once you've set up the custom fields in FUB, you'll see the commission data synced to your ShowSmartly properties:
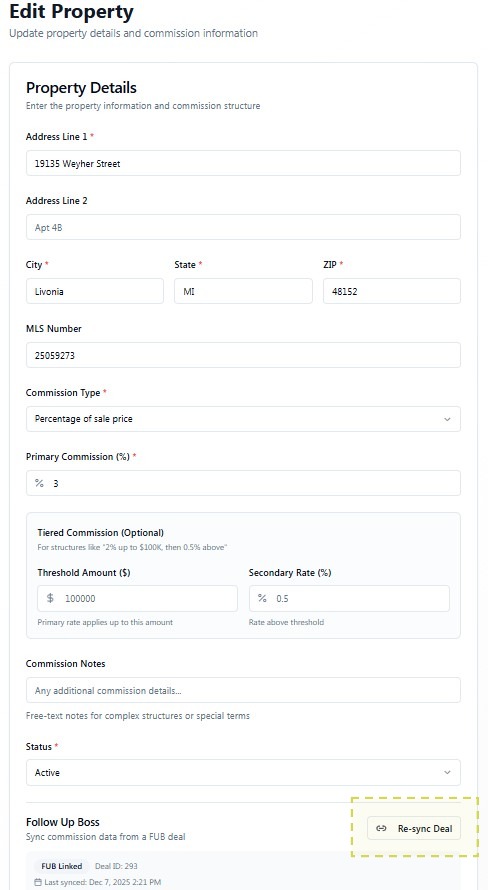
Linking Properties to FUB Deals
For accurate commission lookup, make sure your ShowSmartly properties are linked to the correct FUB deals.
- 1
Go to Properties
Navigate to the Properties page in ShowSmartly. - 2
Select a Property
Click on the property you want to link. - 3
Click "Link to FUB Deal"
Find the FUB Deal section and click to link. - 4
Search and Select
Search for the matching deal in FUB and select it.
Offer Analysis Comparison
When you receive multiple offers on a listing, ShowSmartly's Offer Analysis ranks them side-by-side and recommends an "AI Pick" so you can present clear, defensible options to your seller in minutes—not hours.
Overview
Each offer becomes a labeled column (A, B, C, D…) with its own accent color so it's easy to track across rows. The comparison surfaces every field that matters to a seller's decision:
- ✓Purchase price, with a price-vs-top progress bar and delta (▲ over top / at top / ▼ under top)
- ✓Financing type, down payment, and earnest money
- ✓Contingencies (financing, appraisal, inspection, sale-of-home)
- ✓Close date, escalation clause, and concessions
- ✓Estimated net to seller, "Highest" pill, and the purple "AI Pick" badge
📷 [Screenshot: Side-by-side offer comparison table with A/B/C columns, color accents, and AI Pick badge]
Opening the Offers Tab
- 1
Open Properties
Click "Properties" in the main navigation and select the listing receiving offers. - 2
Switch to the Offers tab
On the property detail page, click the "Offers" tab to open the comparison view. - 3
Review the stack
You'll see one column per offer ordered by AI score, with the AI Pick highlighted at the top.
📷 [Screenshot: Property detail page with the Offers tab highlighted]
Adding an Offer
- 1
Click "Add Offer"
In the top right of the Offers tab, click "Add Offer" to open the entry form. - 2
Upload the offer PDF (optional)
Drop in the signed offer document and AI will extract price, terms, contingencies, and dates automatically. - 3
Review and adjust fields
Confirm or edit each extracted field. Anything AI couldn't read will be flagged so you can fill it in manually. - 4
Save
Click "Save Offer". It immediately appears as a new column in the comparison and is re-ranked against the others.
📷 [Screenshot: Add Offer form with PDF upload and extracted fields]
Reading the Comparison Table
- •A / B / C / D labels — each offer column has a letter and its own accent color (violet, sky, amber, emerald) so you can reference offers verbally with sellers.
- •AI Pick badge — a purple pill above the top-ranked column marks the offer with the strongest overall score.
- •"Highest" pill — green pill next to the price of the highest-dollar offer (which is not always the AI Pick).
- •Price progress bar — each column's bar fills relative to the top price, color-matched to its column accent.
- •Delta text — "▲ $X over top", "at top", or "▼ $X under top" shows how each offer compares to the leader.
How the AI Pick Works
The AI Pick is a weighted score that combines purchase price, certainty of close (financing strength, contingency count, earnest money), close timing, and seller-favorable terms like waived inspections or appraisal gaps. The highest-priced offer often wins, but a slightly lower cash offer with no contingencies can—and frequently does—score higher.
A recommendation, not a directive
The AI Pick is meant to focus the conversation, not replace your judgment. Always review the full table with your seller before responding to any offer.
Sharing With Sellers
Use the Share button at the top of the Offers tab to generate a clean, seller-friendly view of the comparison table. You can copy a link or export to PDF for in-person presentations.
Presenting to sellers
Offer Analysis FAQ
Can I edit an offer after saving it?
Yes—click any field in an offer column to edit inline, or open the offer's detail panel for the full form. The AI Pick re-ranks instantly.
What if AI extraction misses a field?
Missing fields are highlighted so you can fill them in. Re-uploading a clearer scan often improves extraction.
Does the seller see the AI Pick badge?
Only if you choose to share the full comparison view. The shared PDF/link includes the badge by default but can be toggled off before sharing.
Team DISC Management
DISC profiles give every team member a behavioral fingerprint (Dominance, Influence, Steadiness,Conscientiousness) that ShowSmartly uses to tailor coaching prompts, communication style, and lead routing.
Overview
Once a team member has a DISC profile assigned, it appears across the app:
- ✓Team page — agent cards show the primary type and a mini score chart
- ✓Coaching — AI coaching prompts adapt tone and tactics to each agent's style
- ✓Lead routing — match new leads to the agent whose style fits the lead's preferences
Opening the DISC View
- 1
Open Team
Click "Team" in the main navigation to see all team members. - 2
Select an agent
Click any agent card to open their detail panel. - 3
Switch to the DISC tab
Open the "DISC" tab to see the agent's profile, score chart, and assessment history.
📷 [Screenshot: Team page with an agent's DISC tab open showing the radar chart]
Assigning a DISC Profile
There are two ways to assign a profile—choose whichever fits your workflow.
Option A: Agent self-assessment (recommended)
- 1
Click "Send Assessment"
On the agent's DISC tab, click "Send Assessment" to email them a private assessment link. - 2
Agent completes the assessment
The 10–12 minute assessment runs in their browser. Results auto-populate when finished. - 3
Profile activates automatically
Once submitted, the primary and secondary types and the radar chart appear on the agent's tab.
Option B: Manager sets the profile manually
- 1
Click "Set Manually"
On the DISC tab, click "Set Manually" to open the manual entry form. - 2
Choose primary and secondary types
Pick the agent's primary DISC type and an optional secondary type. - 3
Save
The profile activates immediately. The agent can replace it later by completing a real assessment.
Reading the Results
- DDominance — direct, results-oriented, decisive.
- IInfluence — outgoing, persuasive, relationship-driven.
- SSteadiness — patient, consistent, supportive.
- CConscientiousness — analytical, precise, process-driven.
The radar chart shows scores across all four dimensions. The primary type is the highest score; the secondary is the next-highest if it's within the blend threshold.
📷 [Screenshot: DISC radar chart with primary and secondary type callouts]
Using DISC in Coaching
When you open the Coaching view for an agent, ShowSmartly automatically adapts the AI coach's tone and recommendations to their DISC profile. A high-D agent gets concise, outcome-focused prompts; a high-S agent gets supportive, step-by-step guidance. You don't need to configure anything—it just works once a profile is assigned.
Updating or Retaking
From the agent's DISC tab, click "Retake Assessment" to send a new assessment link, or "Edit Manually" to adjust the profile yourself. Previous results are kept in the history log.
How often should agents retake?
Most teams retake DISC annually or after a major role change. Behavioral profiles are stable, so more frequent retakes rarely add value.
DISC FAQ
Is DISC required to use ShowSmartly?
No—DISC is optional. Agents without a profile still get standard coaching and full app access.
Can agents see each other's profiles?
Team members can see the primary type on each agent card. Full radar charts and assessment history are visible to managers and the agent themselves.
Where is assessment data stored?
Results are stored in your ShowSmartly account, scoped to your team, and never shared with other organizations.
Using Manual Mode
If you don't use Follow Up Boss or prefer to manage properties yourself, Manual Mode gives you full control.
Automatic Property Detection
In most cases, you don't need to manually create properties. When ShowSmartly receives a showing request for a new address, it will automatically detect and create the property for you, then prompt you for commission details.
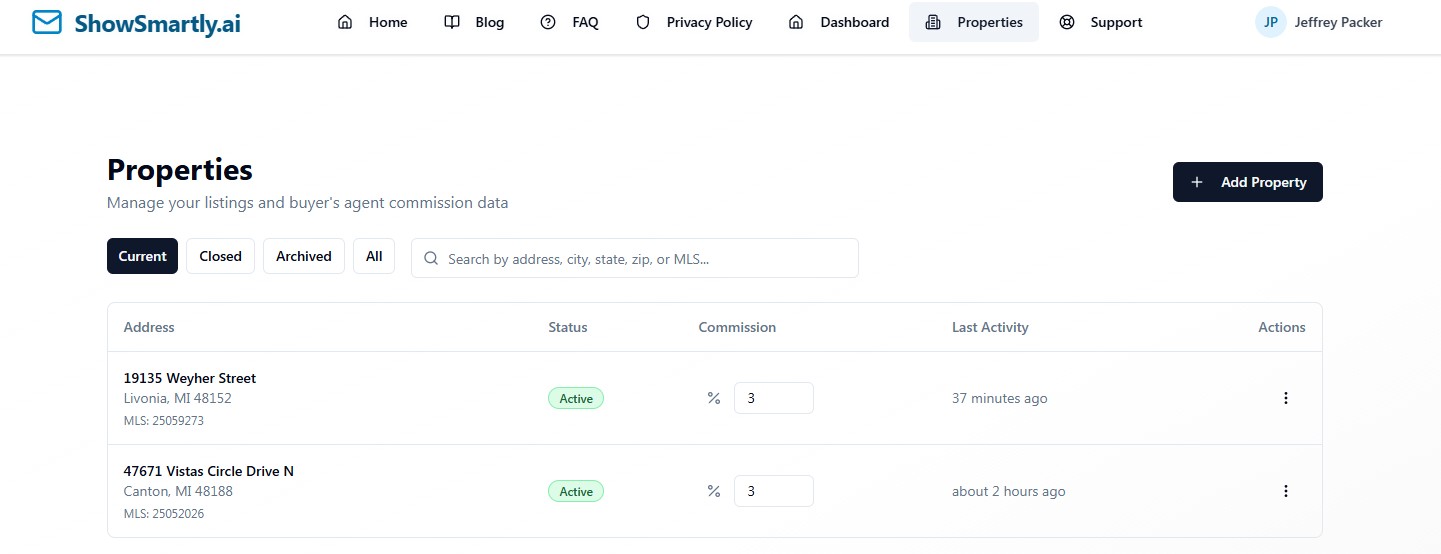
Adding a Property Manually (Optional)
If you prefer to add properties ahead of time, you can do so manually:
- 1
Go to Properties
Click on "Properties" in the main navigation. - 2
Click "Add Property"
Click the button in the top right corner. - 3
Enter Property Details
Fill in the address, city, state, and ZIP code. These must match how the address appears in showing request emails. - 4
Set Commission
Enter the buyer agent commission—either as a percentage (e.g., 2.5%) or a flat amount (e.g., $5,000). - 5
Save
Click "Save Property" to add it to your list.
How Commission Works in Manual Mode
When a showing request arrives for a property you've already added, ShowSmartly uses the commission you set and sends an instant response.
For new properties: When a showing request arrives for an address that doesn't exist in your saved properties, ShowSmartly automatically creates the property and sends you an email asking for commission details.
New Property Flow
Here's what happens when ShowSmartly receives a showing request for a new address:
- ShowSmartly automatically creates the property in your account
- The showing is logged in your dashboard as "Commission Missing"
- ShowSmartly sends you an email asking for the commission details
- Reply to that email with the commission (e.g., "2.5%" or "$3,500")
- ShowSmartly updates the property and sends the response to the buyer's agent
Pro Tip: Add Properties Ahead of Time
Settings Reference
Your settings are accessed by clicking your profile/avatar in the top right corner. This opens a dropdown with four tabs: Profile, Settings, Agents, and Billing.
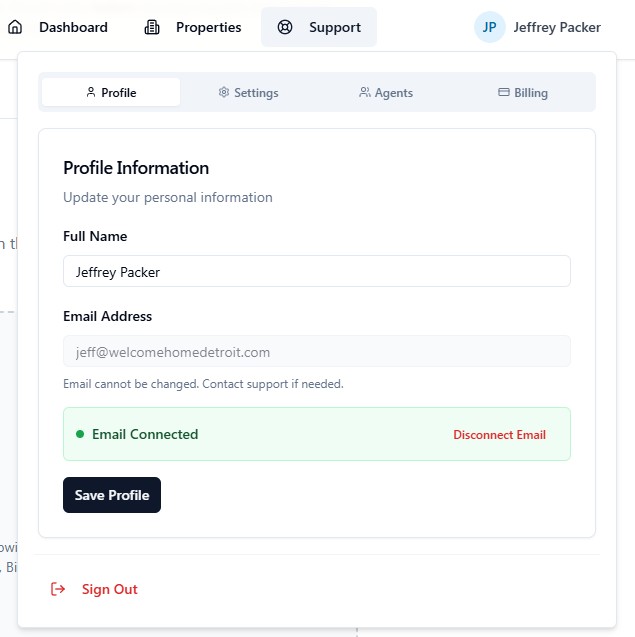
Profile Tab
Manage your personal information and email connection status.
Full Name
Your name as it appears in your profile. This may be used in email signatures.
Email Address
Your login email (read-only). This is the email associated with your Google or Microsoft account.
Email Connection Status
Shows whether your email is connected for monitoring. A green "Email Connected" badge means you're all set. If it shows "Email Disconnected" (red), click the Reconnect Email button to re-authorize ShowSmartly.
Settings Tab
Configure email monitoring, FUB integration, and customize your email template.
Email Monitoring
Toggle to enable/disable automatic inbox monitoring. When ON, ShowSmartly checks your inbox every 15 minutes for new showing requests. When OFF, no emails will be processed.
Last Email Scan
Shows when ShowSmartly last checked your inbox for new showing requests.
Emails Matched (7 days)
A count of how many showing emails have been processed in the last 7 days.
Follow Up Boss API Key
Your FUB API key for automatic property and commission syncing. If you don't use FUB, leave this blank and use Manual Mode instead. See the FUB Integration section for instructions on finding your API key.
Email Template
The body text of your automated responses. Use variables like {{showing_agent_name}}, {{street_address}}, and {{commission_fee}} to personalize each email.
AI Compliance Review
When editing your email template, click the "Review for Compliance" button to have AI analyze your template for NAR compliance, professional tone, and legal considerations. Critical issues must be resolved before saving.
Company Logo
Upload your brokerage or personal logo. This appears at the top of your email responses.
Signature Image
Upload a signature image (like a handwritten signature) to add a personal touch at the end of your emails. Transparent PNG works best.
Send Test Email
Click this button to send yourself a preview of your commission disclosure email, so you can see exactly what buyer agents will receive.
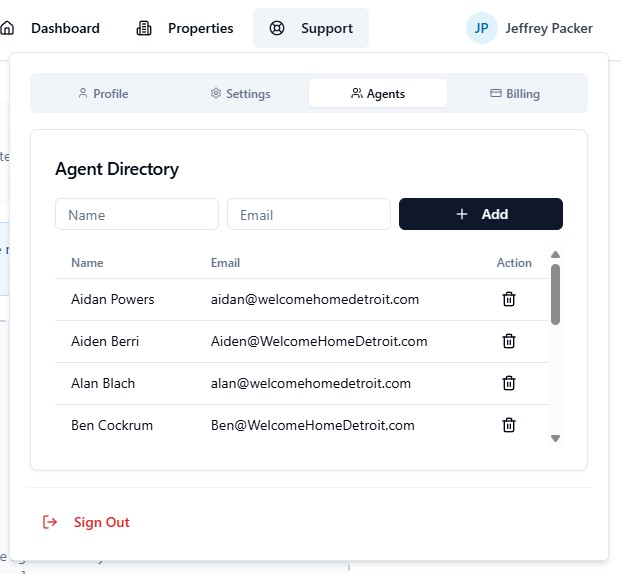
Agents Tab
Manage your agent directory for quick reference.
Agent Directory
Keep a list of agents you work with frequently. Add agents by entering their name and email, then click "Add". You can delete agents from the list at any time.
Billing & Seats
Manage your subscription, seats, and payment information.
Pricing Model
ShowSmartly uses per-seat pricing: $10/month or $100/year per agent. New accounts start with a 3-month free trial.
What's a Seat?
Each agent in your Agent Directory counts as a seat. When you sign up, you (the account owner) are automatically added as your first seat.
Billing Status
Your billing status is shown in the Billing tab: Trial, Active, Past Due, or Canceled. Email automation is paused if your subscription becomes inactive.
Managing Seats
When you add or remove agents from your Agent Directory, click "Sync Seats with Stripe" in the Billing tab to update your subscription quantity.
Need Help with Billing?
Troubleshooting
Showing requests aren't being detected
- • Make sure your email is connected (check Profile tab for green "Email Connected" status)
- • Verify that Email Monitoring is turned ON in the Settings tab
- • Check that showing request emails are arriving in your inbox (not spam)
- • Ensure the email format matches supported showing platforms (ShowingTime, BrokerBay, etc.)
Commission shows as "Missing" for all properties
- • If using FUB: Check that your API key is correct in the Settings tab
- • If using FUB: Make sure your deals have the "Buyer's Agent Commission" custom field set
- • If using Manual Mode: Add properties with commission before showing requests arrive
- • Verify the property address matches exactly between ShowSmartly and the showing email
Email connection keeps disconnecting
- • If you changed your email password, you'll need to reconnect
- • Go to your Profile tab and click "Reconnect Email"
- • For Gmail: Ensure proper OAuth permissions are enabled in your Google account
- • For Outlook: Check your Microsoft 365 security settings allow third-party apps
Properties aren't syncing from Follow Up Boss
- • Verify your FUB API key is correct (it should start with "fka_")
- • Check that you have active deals/listings in FUB
- • Property syncing happens automatically—wait a few minutes and refresh
- • Ensure your FUB account has API access enabled (check Admin → API)
I replied to the commission request email but nothing happened
- • Make sure you replied to the ShowSmartly email (not forwarded it)
- • Include a clear commission value in your reply (e.g., "3%" or "$5,000")
- • Check your dashboard—the property may have been updated already
- • If still not working, add the property manually from the Properties page
Frequently Asked Questions
Is ShowSmartly NAR-compliant?
Yes! ShowSmartly is designed specifically for the post-NAR settlement world. Our responses only share commission information upon request (during the showing process) and never advertise rates publicly.
Can I customize the email responses?
Absolutely! You have full control over your email template, logo, and signature. Use the Settings tab to customize everything to match your professional branding.
What showing platforms are supported?
ShowSmartly works with emails from ShowingTime, BrokerBay, and other major showing platforms. The system recognizes the standard email formats these platforms use.
How do I create a Follow Up Boss API key?
Log in to Follow Up Boss, go to Admin → API in the left sidebar. If you already have a key, copy it. If not, click "Create API Key" to generate a new one. The key starts with "fka_".
What happens if I have multiple listings?
ShowSmartly handles multiple properties seamlessly. Each property can have its own commission rate, and the correct information is automatically included based on which property the showing request is for.
Do I need to manually select Gmail vs Outlook?
No! Your email provider is automatically detected when you sign in with Google or Microsoft. You don't need to configure this—ShowSmartly handles it for you.
How do I get help if I'm stuck?
Contact us at support@showsmartly.ai or use the contact form on our website. We're here to help you get set up and running smoothly!